Expressline99
-
Content Count
13 -
Joined
-
Last visited
-
-
-
 cabinetcrew reacted to a post in a topic:
NV3500 HD, Rattle Trap, Reflectix, Ford Transit bench seats
cabinetcrew reacted to a post in a topic:
NV3500 HD, Rattle Trap, Reflectix, Ford Transit bench seats
-

My 2014 NV3500 modifications Reno Paul
Expressline99 added images to a gallery album in Members Gallery
I'll be putting all my mods here as I go. I've done rattle trap, reflectix, added a 2015 Ford Transit bench seat (3) person, made a frame for skidding pallets into the van. -
-
NV3500 HD, Rattle Trap, Reflectix, Ford Transit bench seats
Expressline99 replied to Expressline99's topic in Interior
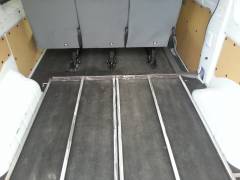
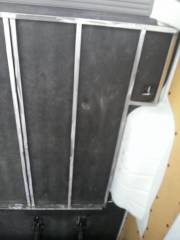
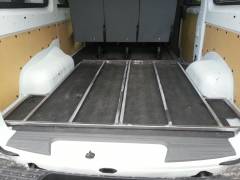
The main reason I got on here today was to post what modification I made this weekend. Plan on carrying fully loaded pallets from time to time. The rubber mat that comes standard in these didn't seem like it could handle pallets skidding across it. Let alone pallets with nails sticking out of them. I could already see my floor mat getting ripped. So I made a frame to skid the pallets on. Since I have installed the bench seats I made the frame 62" long and 53-1/2" wide. This fit in-between the wheel wells with a little room to move the frame around. I knew that it would get pushed/pulled by loading or unloading of the pallets. So I added "ears" to the back end of the frame. They are small boxes that will stop the frame from moving by pushing against the wheel wells or the rear frame. It's made out of 1"x1" box tubing. My welding is poor at best so let’s not get into that. I did actually take pictures of this. I've posted them. My photo album is called: "My 2014 NV3500 modifications Reno Paul" -
NV3500 HD, Rattle Trap, Reflectix, Ford Transit bench seats
Expressline99 replied to Expressline99's topic in Interior
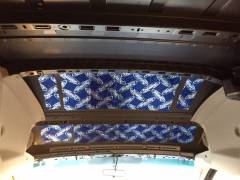
One more thing I just remembered. When taking the headliner out you should put your hand behind it and slide it till you feel the retainers. I recall there are several that are out of sight. Find them with your hands then use the pry tools where you find them to pry straight up as said in the post just prior to this. -
NV3500 HD, Rattle Trap, Reflectix, Ford Transit bench seats
Expressline99 replied to Expressline99's topic in Interior
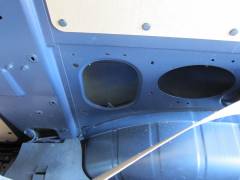
The headliner wasn't very difficult to remove. But while taking it down...and at the very end where you are down to a couple of screws holding it together I highly suggest you get a second pair of hands. I managed to "hinge" it down using a 2x4 to hold it while I removed the last retainers. I bought the super duper panel trim removal tool kit at orilely's auto parts. ($14.99) I think I paid. They are red plastic tools and very useful to properly pry the retainers out. When doing this be sure to get the tool under the retainer so you can pry it straight up. The "u-clips" where your sun visor is held in it's neutral position actually twist 90 degrees to release. I broke a bit of one off taking mine out trying to pry... they don't pry. The underside is shaped like a "T" and is in a slot when twisted it releases. I think you can twist left or right and they will pop right out of the slot. I removed them next to last. However, I removed the rest of the sun visor assembly first. Very easy to do. The headliner wasn't very difficult to remove. But while taking it down...and at the very end where you are down to a couple of screws holding it together I highly suggest you get a second pair of hands. I managed to "hinge" it down using a 2x4 to hold it while I removed the last retainers. The very back of the headliner has several bolts...not a problem. There are also a couple of...not sure what to call them beyond grabbers... that are formed into the plastic of the headliner. These will hold the headliner assembly on even after you remove the bolts. These you have to lightly pull back not down on the entire unit to get it to pop out of the holes. Also while putting it back you may have to arch the same panel to get it back in place. When you go to hinge this down keep in mind there are two connectors directly above the reading/map light that have to be disconnected before removing it completely. This is where I propped up the headliner while I reached in and disconnected them. **Important note one of these connectors goes to your Bluetooth microphone. It is apparently in the light assembly. I removed everything and drove around for a couple of days that way. Your Bluetooth will work...except no one can hear you. It caused me quite a bit of frustration because I didn't notice. To be honest I had no idea what I was looking at when I opened up the side air bag areas. As well I had no instructions I just did it. I didn't have any trouble taking the trim panels covering them up. They are not directly attached to the trim panels as far as I saw. I did not fiddle with the airbags at all once I figured out what I was looking at. Hopefully I'll have some time this week to put a few pictures up. Although I forgot to take any photos while doing the headliner and it's all in place now. What I notice to most for noise now is the sliding door "top". My wife won't let me install anything on it yet.. until I have a solution for covering it.- 15 replies
-
- 1
-
-
- Ford Transit bench seats
- Reflectix
- (and 2 more)
-
NV3500 HD, Rattle Trap, Reflectix, Ford Transit bench seats
Expressline99 posted a topic in Interior
Hello all, Thought I would post a bit about my "new to me" van. I bought it with 8,000 miles on it. I live in Reno, Nevada and flew down to Kerney Messa to get it. Why fly to LA from Reno? The van had windows all the way around like a passenger van and that was a Must Have. I found it at Mossy Nissan. Great people by the way! Anyhow, so I got up at 3am and I flew down there to get it. I quickly completed the deal and left the dealership at high noon. However, the only draw down I saw was the 6 lanes of traffic for the next 3 hours. I think I saw the good the bad and the ugly of the freeways that day. I don't envy the commute anyone does down there...I used to live in the bay area and I thought it was bad there! I managed to get home at 10:30 that night. Decent time with 550 miles of travel and a few stops. It's the cargo high top with the standard rubber mat in the back. The type with about an inch of sound proofing attached to the underside. It's the SV so it has Navigation (no subscription needed) thank goodness. The sound system has CD and Aux connection for MP3 players/phone. I use that with my S3 and it works great. The USB jack in the center console is great for charging. I also had to have the V8 I wanted a van that could get out of the way if needed. This thing is really quick for a cargo. I do notice that because it's huge (9ft high for those who don't know) it either intimidates people or upsets them into dodging around me and cutting me off to get around. I'm used to it now of course. I've been driving it around 2 months or so. It's bare bones in the back with only simple panels in the back on the lower end. Below the windows and also the sliding door. I found that it was horribly loud while driving on the freeway. So on to the modifications. I am just beginning so the list that is done is short. I decided on putting in Rattle Trap Extreme 80 mil. I have put this in on the sides of the van... in the side panels as far down as I could reach inside. It was really deep I'm not sure I quite made it down to the bottom. But it was pretty close. I also did the ceiling and panels above the windows....and of course the area above the cab. Even though it is trimmed out the rattle trap made a huge difference in road noise. I also put it in the rear doors and the sliding door. I did not do the floor because of the sound mat already in place. Just for your reference it took about 125-130 square feet of rattle trap. I paid roughly $300.00 for 150 square feet on ebay. I will probably be putting some of it on the sliding door step...currently removed..and I'll explain that shortly. I might also be putting it in the front doors as I have extra left over. When using the roller to avoid scratching the paint make sure you use the rounded edge towards the support bracing. If you are covering the roof/side panels it probably won't matter. Using actual sound proofing material seems to have been a great idea. There is almost Zero outgassing of the rattle trap. The smell is noticeable but not for long and it's made to stand up to the heat. Roof flashing material will sag or fall off during high heat. DON'T do it! Do it once and do it right! I used a 2x6 piece of wood with an outline of a 3 inch strip on it to cut multiple strips. I did about 10 strips at a time. Larger strips work well on the roof. But the sides and front cab areas needed smaller strips. (on the sides) Trying to install larger pieces in the side walls was horrible. Cut smaller strips it's much easier. While driving back from LA it was up to 104 degrees. I could literally feel the heat cooking me from the rear of the van. So on top of the rattle trap extreme I also decided to install reflectix. This has made a huge difference in temperature. I don't have a temp gun to test it...sorry I can't report that. The reflectix was bought at home depot. It took about 1 and a half rolls to do the roof and cab roof areas. I believe it was 16 inches wide by 25ft long. To apply it I used 3m spray 90. It took almost 3 cans at $13.00 each. I used the same plastic roller supplied with the rattle trap to apply it. The reflectix when up much faster than the rattle trap. It was easy to cut several strips for the roof at a time then apply one at a time while while waiting for the 3m to tack up. I used a cardboard box laying on the concrete to apply the 3m to the installation piece. you spray 2 to 3 coats and wait until it tacks up. Using a knuckle of your finger to test. If the adhesive comes off on your knuckle...it's not ready to apply. Usually waiting 2 to 3 minutes for tacking time was enough for me. So it was quickly apparent that "oops I have two kids" and two front seats won't do the trick. As of yet my entire family hasn't been in the truck driving yet. But this weekend we are installing the seats we bought. I purchased a 3 passenger bench seat from a 2015 Ford Transit. I spent $1,500.00 shipped to a local shipping dock. Not the best deal but for getting the job done properly it made sense and came with floor mounting rails. Most don't! So watch what you buy! These also have built-in shoulder seat belts. Which I did not want to half *ss in place. I've seen plenty of butcher jobs on youtube to know I didn't want to trust my children to an install like that. Some mental notes: First off the Ford Transit rails do NOT sit flat on the floor in the grooves your NV has. I had to place the rails on a piece of 2" flat bar metal to properly support them between the grooves. This allowed me to also put the mounting rails right where I needed them. You want to drill your holes through the support/cross beams not just straight through the floor anywhere... it isn't strong enough. Also use fender/large washers on top and bottom. I used grade 5, 1/2" bolts. 2 of them were 3-1/2" long and 4 were 4" long. This is all for 2nd row directly behind the driver/passenger row. I also used lock washers on all of them. It's easy to see where the beams are by looking for the spot welds. You can go between them. I did all of this without dropping the muffler or the gas tank. Several of the bolts are where you cannot see them. One of mine ended up under a bracket for the parking brake lines. Pay attention to how many "walls" you drill through for that area. It should be two. If you run into three you are drilling into the bracket. I managed to catch the feeling of hitting another space while drilling. I removed the bracket and used a shorter bolt that fit right under the bracket. Also, make sure you don't drill into your gas tank or muffler! There is plenty of room if you only drill through the support brace. It's a two person job. Once drilled (on each one as you go) Someone needs to climb under the truck put the fender washer, lock washer, then the nut on. Most of this will be by feel since you can't see. Then use a wrench to hold the nut while the person on top uses a ratchet to tighten it. This makes it much easier than any other way I could come up with. Well so far this is as much as I have done. I've began to cut the floor mat to allow for the brackets to stick through and I will post pictures of this wonderful thing maybe tomorrow. Sorry for the long post but I had to get it all out of my head! (Copied by sugguestion from introduce yourself area) And I will be using it hauling the odd pallet of products here and there. Still no pictures. But I will get to them. Next plan is to cut finish panels for the upper's and the ceiling. Once they are done and drilled my wife and I are going to carpet/cover the panels before installing again. Paul from Reno- 15 replies
-
- 2
-
-
- Ford Transit bench seats
- Reflectix
- (and 2 more)
-
New owner of 2014 NV3500 V8 high top
Expressline99 replied to Expressline99's topic in Welcome! Introduce Yourself!
So all in favor of me copying to conversions? I won't cause any trouble cross posting?(once) -
New owner of 2014 NV3500 V8 high top
Expressline99 replied to Expressline99's topic in Welcome! Introduce Yourself!
I'll be hauling the odd pallet of cargo here and there. Of course I'll need to use the small trailer I have now to carry anymore than 1 since the seats are installed. I actually use it as my daily driver now. I originally had a dodge ram 2500 and had intended on going smaller. How'd I do? :) Also, during the winter I'll be driving it up to go skiing. So I'll be buying studded tires soon. Of course if its very rough I'll take the wife's car or get a ride from friends that ski as well. -
Hello all, Thought I would post a bit about my "new to me" van. I bought it with 8,000 miles on it. I live in Reno, Nevada and flew down to Kerney Messa to get it. Why fly to LA from Reno? The van had windows all the way around like a passenger van and that was a Must Have. I found it at Mossy Nissan. Great people by the way! Anyhow, so I got up at 3am and I flew down there to get it. I quickly completed the deal and left the dealership at high noon. However, the only draw down I saw was the 6 lanes of traffic for the next 3 hours. I think I saw the good the bad and the ugly of the freeways that day. I don't envy the commute anyone does down there...I used to live in the bay area and I thought it was bad there! I managed to get home at 10:30 that night. Decent time with 550 miles of travel and a few stops. It's the cargo high top with the standard rubber mat in the back. The type with about an inch of sound proofing attached to the underside. It's the SV so it has Navigation (no subscription needed) thank goodness. The sound system has CD and Aux connection for MP3 players/phone. I use that with my S3 and it works great. The USB jack in the center console is great for charging. I also had to have the V8 I wanted a van that could get out of the way if needed. This thing is really quick for a cargo. I do notice that because it's huge (9ft high for those who don't know) it either intimidates people or upsets them into dodging around me and cutting me off to get around. I'm used to it now of course. I've been driving it around 2 months or so. It's bare bones in the back with only simple panels in the back on the lower end. Below the windows and also the sliding door. I found that it was horribly loud while driving on the freeway. So on to the modifications. I am just beginning so the list that is done is short. I decided on putting in Rattle Trap Extreme 80 mil. I have put this in on the sides of the van... in the side panels as far down as I could reach inside. It was really deep I'm not sure I quite made it down to the bottom. But it was pretty close. I also did the ceiling and panels above the windows....and of course the area above the cab. Even though it is trimmed out the rattle trap made a huge difference in road noise. I also put it in the rear doors and the sliding door. I did not do the floor because of the sound mat already in place. Just for your reference it took about 125-130 square feet of rattle trap. I paid roughly $300.00 for 150 square feet on ebay. I will probably be putting some of it on the sliding door step...currently removed..and I'll explain that shortly. I might also be putting it in the front doors as I have extra left over. When using the roller to avoid scratching the paint make sure you use the rounded edge towards the support bracing. If you are covering the roof/side panels it probably won't matter. Using actual sound proofing material seems to have been a great idea. There is almost Zero outgassing of the rattle trap. The smell is noticeable but not for long and it's made to stand up to the heat. Roof flashing material will sag or fall off during high heat. DON'T do it! Do it once and do it right! I used a 2x6 piece of wood with an outline of a 3 inch strip on it to cut multiple strips. I did about 10 strips at a time. Larger strips work well on the roof. But the sides and front cab areas needed smaller strips. (on the sides) Trying to install larger pieces in the side walls was horrible. Cut smaller strips it's much easier. While driving back from LA it was up to 104 degrees. I could literally feel the heat cooking me from the rear of the van. So on top of the rattle trap extreme I also decided to install reflectix. This has made a huge difference in temperature. I don't have a temp gun to test it...sorry I can't report that. The reflectix was bought at home depot. It took about 1 and a half rolls to do the roof and cab roof areas. I believe it was 16 inches wide by 25ft long. To apply it I used 3m spray 90. It took almost 3 cans at $13.00 each. I used the same plastic roller supplied with the rattle trap to apply it. The reflectix when up much faster than the rattle trap. It was easy to cut several strips for the roof at a time then apply one at a time while while waiting for the 3m to tack up. I used a cardboard box laying on the concrete to apply the 3m to the installation piece. you spray 2 to 3 coats and wait until it tacks up. Using a knuckle of your finger to test. If the adhesive comes off on your knuckle...it's not ready to apply. Usually waiting 2 to 3 minutes for tacking time was enough for me. So it was quickly apparent that "oops I have two kids" and two front seats won't do the trick. As of yet my entire family hasn't been in the truck driving yet. But this weekend we are installing the seats we bought. I purchased a 3 passenger bench seat from a 2015 Ford Transit. I spent $1,500.00 shipped to a local shipping dock. Not the best deal but for getting the job done properly it made sense and came with floor mounting rails. Most don't! So watch what you buy! These also have built-in shoulder seat belts. Which I did not want to half *ss in place. I've seen plenty of butcher jobs on youtube to know I didn't want to trust my children to an install like that. Some mental notes: First off the Ford Transit rails do NOT sit flat on the floor in the grooves your NV has. I had to place the rails on a piece of 2" flat bar metal to properly support them between the grooves. This allowed me to also put the mounting rails right where I needed them. You want to drill your holes through the support/cross beams not just straight through the floor anywhere... it isn't strong enough. Also use fender/large washers on top and bottom. I used grade 5, 1/2" bolts. 2 of them were 3-1/2" long and 4 were 4" long. This is all for 2nd row directly behind the driver/passenger row. I also used lock washers on all of them. It's easy to see where the beams are by looking for the spot welds. You can go between them. I did all of this without dropping the muffler or the gas tank. Several of the bolts are where you cannot see them. One of mine ended up under a bracket for the parking brake lines. Pay attention to how many "walls" you drill through for that area. It should be two. If you run into three you are drilling into the bracket. I managed to catch the feeling of hitting another space while drilling. I removed the bracket and used a shorter bolt that fit right under the bracket. Also, make sure you don't drill into your gas tank or muffler! There is plenty of room if you only drill through the support brace. It's a two person job. Once drilled (on each one as you go) Someone needs to climb under the truck put the fender washer, lock washer, then the nut on. Most of this will be by feel since you can't see. Then use a wrench to hold the nut while the person on top uses a ratchet to tighten it. This makes it much easier than any other way I could come up with. Well so far this is as much as I have done. I've began to cut the floor mat to allow for the brackets to stick through and I will post pictures of this wonderful thing maybe tomorrow. Sorry for the long post but I had to get it all out of my head! Paul from Reno.
-
 How difficult is it to install rear speakers? Do the connectors on the head unit need to be modified?
 -
 I hit a bat while coming back from getting my NV3500 high roof. That was so loud I couldn't believe it. I'm installing fatmat everywhere. The main reason/way it works is to add weight to the panels. This deadens the sound. However, most companies that install it for you put it in with spaced strips. I'm of course going overboard myself and installing almost full coverage. I'm down to just this part Carmen has done. The part right over the front. This looks really good. I'm going to upgrade my speakers while I'm at it after looking at these pictures.