Phomollient
-
Content Count
25 -
Joined
-
Last visited
-
Days Won
7
Recent Profile Visitors
714 profile views
-
-
-
-
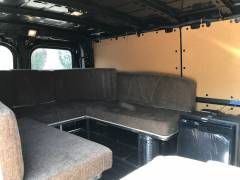
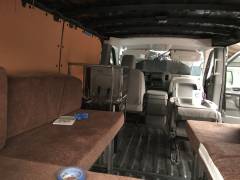
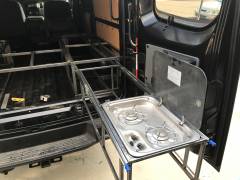
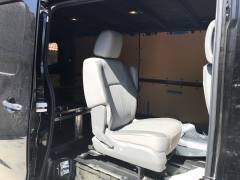
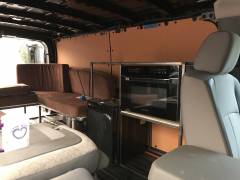
 Sold new in 2014 as a 2014 N6 Active model. Roadtrek built these using new, special order 2012 Nissan NV2500 vans. Accordingly it is titled as standard a Nissan NV2500 van. Arizona title in my name with no issues other than I have a lien I am in the process of paying off. Because it is titled as a 2012 van the registration is less than $250.00 a year. The van has less than 47K original miles. It is a 5 speed automatic with overdrive, two wheel drive with a 317 horse 5.6 V8 with 385 feet of torque. This van drives and rides like a car, is fast, and can tow 9K lbs. I have owned it for the last four years and it has been garaged. It has a 2" lift with brand new wheels and 33" tires. The van has many customizations such custom bumper with dual swing out tire carrier and jerry can holder, dual engine compartment batteries (this is in addition to the two Lifeline AGM batteries that power the coach), a hidden 10K lb winch in the front bumper that has never been used and hot water system in the front bumper. The front bumper hot water system consists of an all aluminum heat exchanger that is tied into the engine's heater hose system. Hot water intended for the heater core runs through the exchanger and then back to the heater core. The heat exchanger is also plumbed to a 12 volt water pump which terminates with a suction fitting (quick release) in a custom housing inset into the van's front bumper on the driver's side. There is an on and off switch in said housing. To operate, two hoses are attached to the quick release fittings. One of the hoses is placed in a bucket of water and the other hose has a spray nozzle. With the engine warm and running turn the switch on and the system sucks in the cold bucket water, heats it, and sprays unlimited hot water. Temperature can be controlled by circulating the water in the bucket then turning engine off and using the pump as a sprayer. Temperature can also be moderated by running the heater in the cab (lowers the water temperature). Other modifications: The N6 came from the factory with a wimpy microwave, a weak 110 inverter, a poorly working "refrigerator" that only worked when the 110 inverter was running and a hot water system that could only make water for a few cups of coffee. The rear bench seat, which converts to a 6.5' long bed and is approximately 54" wide was not very comfortable. To address these issues all the seats were reupholstered using matching synthetic leather. The reach bench seat bed was padded with interior memory foam. Now it is super comfortable! A custom cabinet module was made out of light weight 3/4" steel tubing with all welded connections. It bolts to the van and is easily removable. It has a sink and gas cooktop as well as a "notch" which holds a 65 quart portable fridge and freezer (included with the sale). The rear of the cabinet module has another "notch" that holds a 110 volt, stand up portable air conditioner. The 10K btu unit is removable (and included in the sale). This AC would typically be used at an RV site with 110 power or a portable generator (I do not have a generator). The cabinet module needs some finishing as follows: The frame is bare steel and needs paint or powder coating. The sink plumbing (which simply drains through the floor to the ground) needs to be put together (I have all the parts--an easy job) and the through hole (which Roadtrek made) is already in place. The fridge freezer is fully functional and is excellent. It will make ice and draws very little current. The coach batteries can run it for over a week, with heavy use, without recharging. The original inverter was underpowered. It would barely make 900 watts. That inverter was replaced with a Tripplite 2000 watt plus inverter and battery charger (when the van is plugged in to 110 volts the electric "passes through" to all connected appliances and also charges the 12 volt coach batteries. The all new, stainless microwave (never been cooked in) is 1300 watts and features a dual cooking mode that acts as a conventional oven when that mode is initiated. It can also microwave and conventional heat at the same time--good for pizza that isn't soggy. The flooring is also all new. Roadtrek used a thin laminate over the underlayment. This was replaced with heavy duty, all manmade material flooring that was routered for a perfect fit. The table mounts in the floor are in the Roadtrek factory places. Roadrek reused the stock Nissan plastic entry step liner. The problem with this is that the subflooring necessitated Roadtrek to shim the plastic step 3/4" rendering it ill fitting and a bit flimsy. This was remedied by a custom, all aluminum (1/8" thick) step liner. It bolts in at all the Nissan factory locations, is very strong and fits perfectly. The rear swing out tire carrier and jerry can assembly is custom made as is the rear bumper. The bumper bolts at the factory Nissan locations and is independent from the factory Nissan tow hitch module. The bumper is extremely strong (3/16" plate steel) and the tire and jerry can modules are adapted from Kaymar units using Kaymar OEM spindles and latches as well as gas struts. (Kaymar is a high end Australian company that specializes in overlanding). The Roadtrek 30 amp input was replaced and relocated to the side of the bumper (Roadtrek had it under the van and a pain to hook up). In the front OEM bumper is a hidden 10k lb winch that has never been used. The winch mount is bolted to the frame (frame unaltered and bolts to all OEM connections points via a custom winch plate). Dual engine batteries via custom battery tray. Has a high tech battery sepearator that keeps the second battery from depleting in the event the first battery is drained. When the first batter is drained, manually depressing a button on the separator links the second battery to enable starting. Both batteries charge anytime the engine is running, as well as the two coach batteries. The space next to the cabinet module was designed for a flushing, macerator toilet. Behind the plastic wall there is a 1 1/2" RV sewer hose that is installed and ready for connection to the toilet. The hose is routed along the frame rails' top to a custom 14 gallon tank at the rear of the van. The van has a custom 1/4" aluminum skid plate that creates a space where the spare tire used to be. The skid plate attaches to the underside of the tow hitch framing and is removable. It can also tilt down for easy access. The skid plate is fully fabricated and complete but the tank has not been mounted yet nor has the hose been installed to the tank (hose is in place and ready to be hooked up). I also have all the parts for the dump valve, vent, etc. Roadtrek used an 8 gallon plastic tank for the sink drain. I still have the tank and my design was to repurpose this tank in the original Roadtrek location as the water source for the toilet flush. The toilet is new, never used Tecma unit. It is a 1500.00 toilet (on sale) and it is porcelain. The toilet has an internal macerator and pump that grinds waste and pumps it up to 20' uphill. It will easily pump waste in the installed 1 1/2" RV sewer hose that is already installed to the holding tank at the skid plate. The toilet has an inlet water connection that will need to be fed from the 8 gallon Roadtrek tank via a 12 volt pump. The toilet's handle is designed to activate any external 12 volt water pump. The toilet has been mounted to a custom 1/2" Corian base. The toilet is easily removed from said base via two bolts in factory locations on the sides of the toilet. The Corian base is designed to be screwed to the floor of the van next to the cabinet module. The toilet then bolts to the custom base for easy removal or installation. The power camper top works flawlessly. One button up or down and locks into place in either configuration. Two adults can sleep up top if they are a couple or two kids easily. When the bench seat is in bed mode (manually set up) two adults can sleep comfortably. The new wheels and tires are high quality units and are oversized. They are the largest wheel and tire combination that can fit without major modifications to the sheet metal and the sliding door. The sliding door on the Nissan van's is one of the limitations to tire and wheel width. This van's door opens without touching the tire--its close but completely clears. This was accomplished by using the OEM Nissan door sliding hinge with some modification. The modification did not require any cutting or bending or alteration to the OEM configuration. Instead, a custom all aluminum spacer was placed behind the OEM slider hinge base and then custom "female" bolts were made to go over the OEM mounting studs. This was required as the OEM studs were too short to go through the custom spacer and the OEM hinge base using a conventional nut. The van runs perfectly and handles and rides like a car. It can easily pass anything on the road going up the I17's hill on the way to Flagstaff. I typically get 14.5 MPG in all around driving (I'm not a lead foot). Recent emissions good for a year. The interior is clean with no smells. Everything works as it should including the engine driven dual AC system which is very powerful and has no trouble keeping all passengers cool. The rear bench seats has seat belt provisions for three adults. The front seats are very comfortable and both swivel 360 degrees. There is a removable table that folds up and stores above the driver's roof. The exterior is in very good to excellent condition with no paint fading. There are the usual chips in the hood consistent with the mileage. The van is not 4x4 but Advanced Four Wheel Drive in Salt Lake City converts these to 4x4 for 11K. The only trade I am potentially interested in is a mini excavator at least 6k lbs with low hours. Aside from that I have no interest in trades. The reason for the sale is we just don't use it and its too valuable to just sit. Van is ready to be driven anywhere. I am an Arizona licensed attorney and can be looked up in the State Bar 602-616-three three seven five registery.
 -
-
-
Sliding door interference solved for wider tires.
Phomollient replied to Phomollient's topic in Accessories & Modifications
Thanks! -
-
- 1 reply
-
- 3
-

-
Im on my second NV2500. The latest one is the Roadtrek N6 Acrive. I have run 275/70/18’s (33.4x11) on Method wheels with no rubbing on the door or elsewhere but it was close with the sliding door—really close. I decided I wanted more ground clearance so I lifted it 2” in the front and 1” in the rear using a spacer kit with rear blocks. I’ve seen NVs with 6” lifts with 35’s but that’s too tall (lift-wise) for my taste and unnecessary to run 35s. The two inch lift will accomplish that without huge gaps in the wheel well. As far as I can tell the only reason for a 6” lift is so that the sliding door will clear an oversized tire. I’m installing 34x11.5s soon but anticipated the door would be a problem. Some have shimmed the hinge on the sliding door but the studs are too short for meaningful space. After days of experimentation I have a way to run 33x11s and have 3/4” clearance between the tire and sliding door. Door opens all the way, locks and closes as per stock. I used a 1/4” piece of plate aluminum, a used door hinge off EBay (to experiment on), three .047” round, threaded sleeves (1.2” long” with M8 1.25 threads, three large nuts and three 3/16” washers with 1/2 holes. 1/4” is the Max the door can be shimmed. I tried 3/8” and the door would not close right. Tools: sawsall, vice, drill press or drill, 31/64 bit, 15/32 bit, 1/2 bit, 11/16” bit, 4” hand grinder with an ALUMINUM-only flap wheel, tig welder or perhaps brazing rod and torch, hammer, socket and a 1” M8 1.25 bolt. Step One: Drill out the nut of your choice (use a larger nut) with the 15/32 bit. Step Two: Thread the M8 bolt into the threaded sleeve (to keep threads from deforming). Tap the head of the M8 bolt (threaded into the sleeve) and press the sleeve into the nut you drilled out in previous step. Using an appropriate size socket, place socket on to the nut and tap the socket driving the nut down on the sleeve until there is only 1/2” protruding on one side. This will be the side that goes into your new modified hinge. Step Three: Tig weld the nut to the sleeve on the side OPPOSITE the 1/2” . I expect it could be successfully brazed as well. Step Four: Unbolt the hinge from the door when the door is locked open all the way. The other hinges will take the weight of the door. Remove the hinge from the slide rail. Step Five: Trace the outline of the hinge mounting surface on to the 1/4” aluminum plate. Clamp the aluminum plate in a vice and using a sawsall and drill rough cut the part. Using a 4“ hand grinder with an aluminum flap wheel sand the part until it closely matches the outline of the hinge mounting surface. When you are satisfied with the shape of your aluminum spacer carefully trace the hinge’s mounting holes on to the spacer. Be as precise as possible. Center punch the holes and drill all three to 1/2” and the center ONLY to 11/16”. Step Six: Drill all three of your hinge mounting holes to 31/64. This ensures proper alignment with the door studs as the bolt you created in Steps One, Two and Three have an O.D. that fits snugly with little play. Drill the middle (square hole) to 11/16. This is the only hole that is this size. Step Seven: Reinstall the hinge with your spacer first, then hinge. Place the 3/16 thick washers over your fabricated bolts and place bolts into the hinge and through your spacer’s bored holes. Tighten.
-
-
2016 NV 2500 SV BLACK with only 2500 miles: $24500.00
Phomollient replied to Phomollient's topic in Nissan NVs For Sale
Thank you. I took your advice and posted on the Sportsmobile forum. -
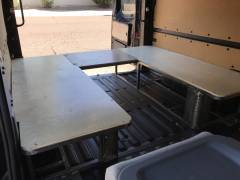
Like new. Tows 9k plus. 320 horsepower with 385' torque. New front wireless winch and dual batteries with isolator. Custom steel rear U shaped dinette converts to almost king size bed. Custom roof rack (needs finishing). The van is fast and handles excellent. Wheels and tires are all new. Van was in a mild front passenger side accident with no cab or frame damage. No air bag deployment. Professionally repaired with all Nissan parts: hood, grille, passenger side inner and outer fender, front bumper, head light, radiator and condenser. Repair was at 250 miles. Entire repair was bolt on parts--no welding, no bondo. Frame/suspension/engine was untouched and is pristine. Have all before pictures. Paint is excellent with only the hood, passenger fender and bumper facia having been professionally painted. Fully loaded-all power and cold AC. Navigation, cruise, 110 volt house electric outlet from factory. Remote starting/alarm. Power windows and mirrors. Towing package. Passenger side rear sliding door has two windows that open with screens. Rear-most passenger side has matching non-opening window. Factory-style black vinyl "carpeting" throughout. Rear dinette has a pull-out 4' long "drawer" on 500lb ball bearing sliders that holds an in-built gas cook top (included but needs minor installation). Dinette base is all steel and bolts in at factory locations--no drilling holes in the van. Bases need to be powder coated or painted. Roof rack is 10’x64” and needs finishing. It’s currently not installed. The custom roof rails, which bolt to the factory roof rack mounts, are installed but need to be powered coated. The roof rack bolts to these rails. Buyer will have to install the rack—I herniated a disk and cannot help. Rack is 150lbs with uninstalled mesh floor. Sale includes new 12 volt fridge and convection microwave with custom steel frame (not installed and needs finishing). The van has a factory 110 inverter that will run the microwave. Also included a Airpax 1200 watt, 120 amp 110 volt inverter with inbuilt cooling fan—heavy duty. Has the front factory bucket seats and a third (matching) factory seat I had installed behind the front passenger seat--seats three in the bucket seats and at least 4 in the rear (have side-facing seat belt harnesses not installed). The bed can be configured in several ways in the seating position: “U” shaped or, by removing the bolt in rear-most section, two facing bench seats with 26” of “hallway” in between them. USAA has valued (taking into consideration the rebuilt title) this van at $26750.00 (not taking into account the after market wheels and tires, winch, alarm, etc). They will loan, on approved credit, $21500. For 60 or 72 months. You do not need to be a veteran to get a loan. Can be converted to a 4x4 van for 11k by Advanced 4x4 in Utah. Selling to build a house. Currently listed on EBay. David at 602-616-3375
-
-
-
-
4081FFED F900 4BF3 A289 3C4FC4260A5F
Phomollient commented on Phomollient's gallery image in Members Gallery
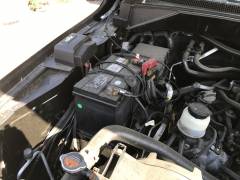
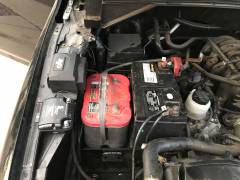 This is my dual battery set up. Also the battery isolator and the winch control box.
 -
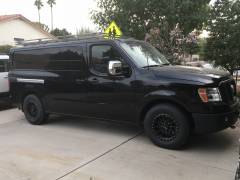
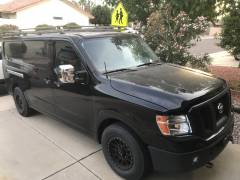
I built a pair of roof rails that bolt to the 10 factory mounting points (5 each side). The roof rails are 1 5/8” tall measured from the factory roof mounts. The rack, which is a separate unit, sits on top of the roof rails and bolts to them.
-
-
-
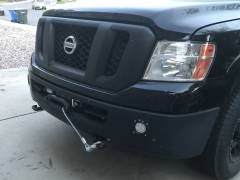
Front bumper is relatively easy to remove. The plastic insert is a pain but not hard. You have to force out the plastic pins to remove. You will also have to remove the grille (more plastic pins). The winch mount sits atop the frame rails with modifications. I used Smittybuilt’s 9500 low profile winch. If I can figure out how to post pics I will.
-
As you can see from the pic there is room in the stock bumper to mount a low profile winch. I used a Harbor Freight universal winch mount and modified the heck out of it.
-
Hello, all. Been a quiet member for awhile now. I built a rack and need honest opinions. The rack took some time to design and then build. I fear my family and friends don’t want to hurt my feelings. Is it too boxy\bulky? It’s is 5 3/4” tall, 122” long and 62” wide. Used square tube to try and march the box-like styling of the NV.