

GoNV
-
Content Count
42 -
Joined
-
Last visited
-
Days Won
6
Posts posted by GoNV
-
-
If they installed new struts in the front they could have bumped the alignment out of spec and you might need to go get it done.
-
I had people pretty much fighting over mine it seemed like. Constant offers at or around my asking price. I think everyone wants to get out this year and vans have been selling like crazy. I haven't decided to accept any offers since I'd also like to travel a little this year with it.
Also Nissan did end the production. I remember when I still worked for them in 2018 they were saying they were going to but I still chose to buy one knowing they were the best built.
-
I cant believe how easy it is to fit 35s on these vans, most vans have issues trying to fit 31-33" tires.
-
This sounds like a case of dealer playing stupid. To have enough weight to cause that problem would probably make your van not able to drive. I'd try to find another dealer. Plus this doesn't seem like a common problem anyways.
-
What 2" lift did you install?
-
-
3 hours ago, klmlb said:Makes sense! Thank you very much. Yes, I can see now how that spot is the cleanest spot to install. Very nice install.
Do you recall if the part is threaded or smooth?
I went to Webasto's accessory catalog and will continue to look for that part, but can't find it yet.
There is a part (order number 1322827A) that is similar (not a solid stub piece like yours), but a right angle steel piece that says is made for plastic or metal tanks. (pdf page 7, manual page 13 bottom right). It doesn't have the large stub look that you have (which seems more stable and less likely to "move" or "twist"). I can try to call them to see if they still sell the part you have.
Again, many thanks. You have no idea how much I appreciate your response.
When in doubt use eBay!
This is the one i ordered. https://www.ebay.com/itm/Webasto-Eberspacher-Heater-Part-Universal-Fuel-Tank-Stand-Pipe/192623638065?ssPageName=STRK%3AMEBIDX%3AIT&_trksid=p2057872.m2749.l2649
You can shop around and find others that are similar designs also.
You should put loctite on the threads for it and you'll have to trim it to be shorter since they come universal.
-
49 minutes ago, klmlb said:Wow outcruzin! Thank you so much for the info and the pictures!
Amazing work. Awesome. I can't imagine how many hours to do it, but this is quality work done right.
From the metal tap into the fuel assembly, you said not to drill in the plastic since it will crack later on. How did you insert the metal tap? Is the rubber tubing simply clamped on the bottom side of the fuel assembly "ceiling"?
Thank you!
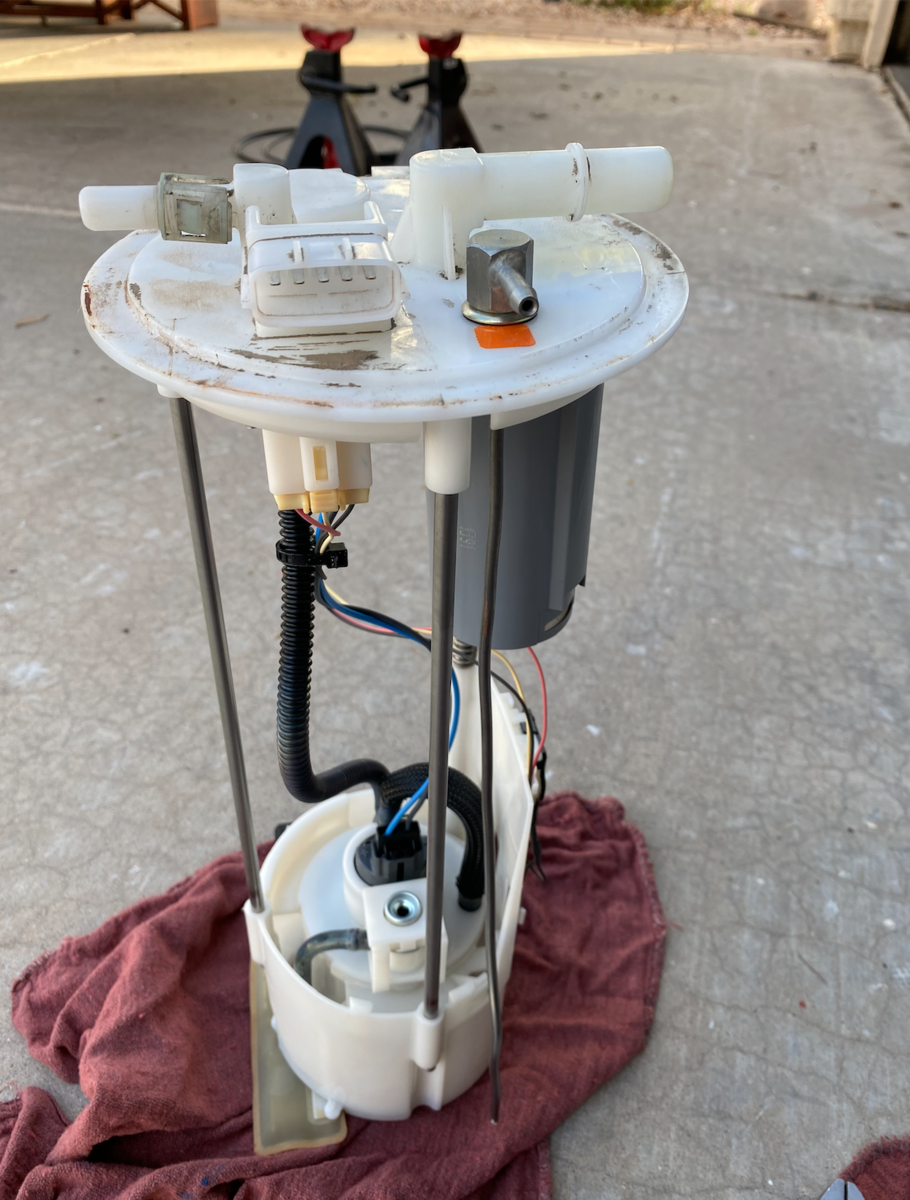
I was saying you shouldn't drill the tank because if there's any issues you'd have to replace the whole tank instead of the sending unit, plus it can lead to cracking. So install it into the sending unit. If you look at my picture that was the best spot that didn't interfere with any wires or the metal plate that sits on top of the sending unit.
Also you'll need to order a webasto fuel tap like the one in the picture. The one that comes with the heaters are meant for big rigs.
-
-
Hey there,
The campervan radin2son was talking about is actually mine!
Theres only a number of NV's in the country that have installed them and actually one of them at a van builder did it incorrectly.
I did mine myself with the intention of doing a write up for this site. I'll see if I can attach photos.
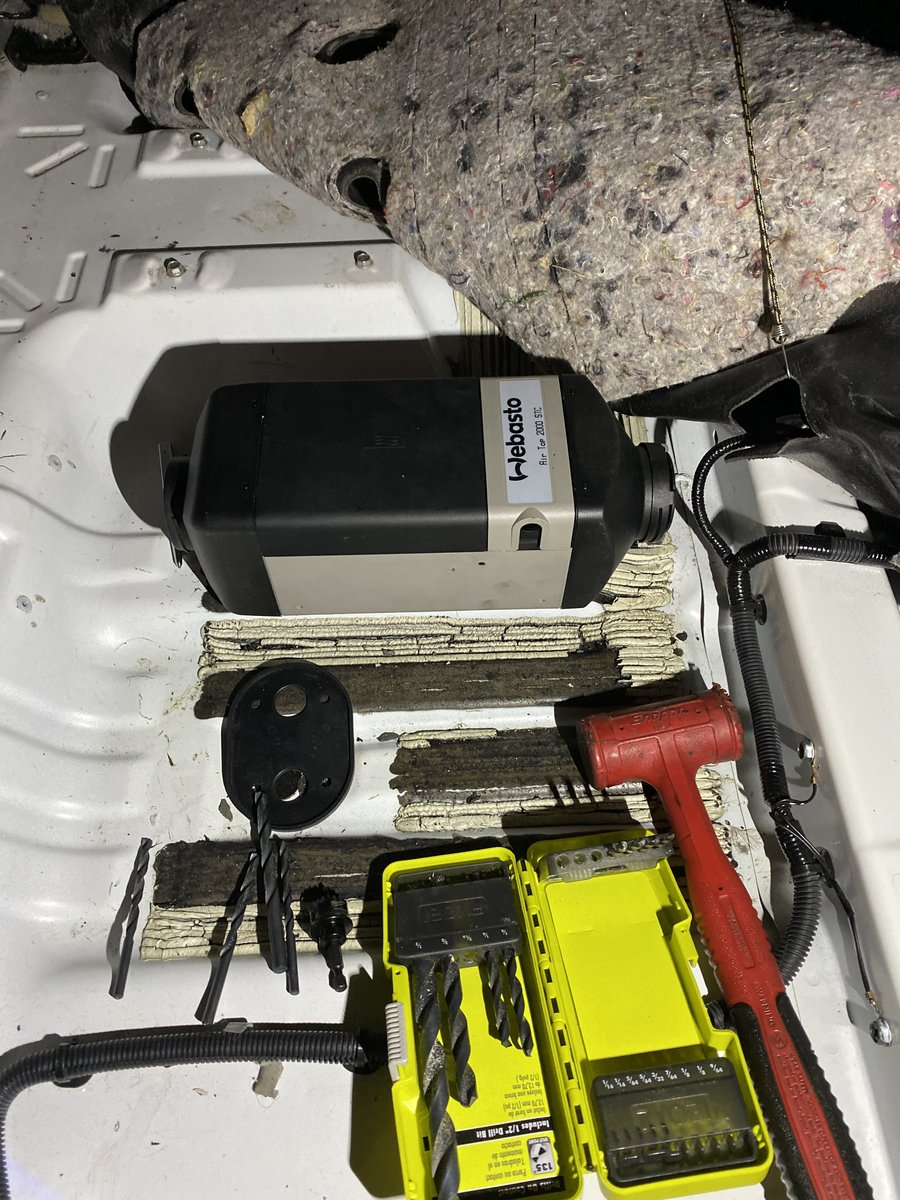
But I purchased a Webasto STC and installed it under the passenger seat (yes I also have a swivel so it'll fit no problem). You will have to remove the sliding tray mount to make room for it.
Remove the seat and fold back the carpet. There will be a somewhat large flat spot you can install it in.
You will not need a bracket or gasket doing it this way since its direct mount to the metal floor.
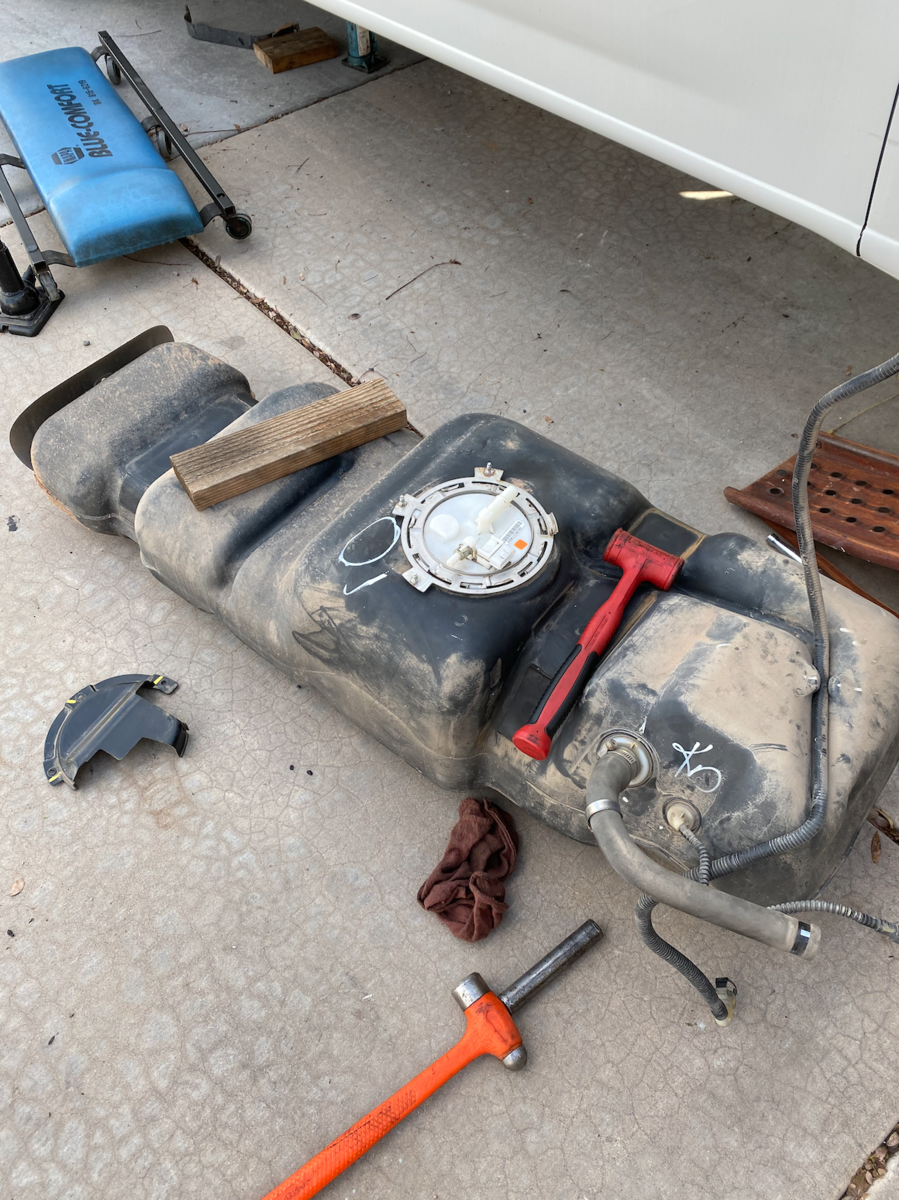
You will drop the gas tank which is held by 2 tank straps. Make sure you drive until empty when you do this or close to it, I was able to do it at 1/8th but it was a heavy sob.
Once dropped I cleaned the outside of the tank and remove the sending unit. Look at the pictures and see where I installed the tap. I believe this to be the only spot on the sending unit.
Do not use the tap that comes with the webasto, its meant for metal tanks. Also dont drill the plastic gas tank, it will lead to cracking in the future.
Update Dec 2021: I see a lot of people overthinking this install and not understanding that it fits or needing more pictures.
I do not own the van anymore but the pictures are fairly straight forward.
This is a gas model Webasto installed under the passenger seat, also under the swivel seat. No clearance issues.
I found the flattest spot where the surface area of Webasto exhaust could fit. You can see its towards the middle/transmission tunnel of the van but still in that belly area underneath the passenger seat..
Air intake is pointing towards the dashboard.
You have to scrape the floor deadening off with something like a flathead and hammer.
Match up the top area where you'll drill with the underside to double check you won't drill into anything. There's isn't really much in that area.
The Webasto comes with all necessary instructions. Use the rubber grommet that installs onto the exhaust for a stencil to drill the holes.
Hit the fresh metal with some white paint after cutting holes and install the heater.
You'll need fuel grade hose for the heater to run it into the sending unit of the fuel tank. I also wrapped my hose in a higher temp plastic conduit to protect from any road debris.
I ran my fuel line with the fuel pump down the passenger frame rail, across the frame/transmission support area, then down the driver side frame rail.
Fuel pump was installed on the driver side within the required distance from the tank.
When in doubt read the instructions or find a sprinter heater install for a cross reference.


 WanderlustAV and radin2son reacted to this
 -
Wish you were in Phoenix! would buy these asap.
-
Probably a brake booster. I've seen some models have this problem randomly. Definitely not something common.
-
You can call a Nissan dealer and ask if theres a software update available on your VIN. I believe there were some models getting this but dont quote me on it. When i worked for R&D there was an update after 12'.
I'd say go find a parking lot or empty road and cruise maybe around 30-40mph, slam the brakes and try see how the ABS reacts. If you're not confident in this obviously dont do it.
-
Why did you decide to do the water pump?
-
If this was the Sprinter forum this thread would be filled Hahaha.
85k and just did the plugs because I was going on an extended road trip, wasn't needed.
Did brakes on all four corners, still were in ok condition but would have needed changed in 10k. Not bad for OEM.
-
Honestly after working for Nissan for a number of years and helping with development of the Diesel Titan, I understood why they got rid of it.
They really didn't sell too well and I know they had a handful of drivetrain problems after seeing some myself and dealer techs telling me all about it.
The next 10 years will really tell us how Nissan is deciding to model their vehicles.
-
Swivelsrus is the only company to offer them for the NV. Before i purchased from them i reached out to a dozen van sites to see if there was any others. Discountvantruck.com said they were working on manufacturing but I dont know how far they got.
I purchased mine from swivelsrus and will say the build on it is very strong, but the customer service was shit. They had placed an order 3 times with each one getting delayed by 30 days. So send them a direct email before purchase and ask if theres any in stock.
-
Great post and enjoy your travels.
This site is barely on life support and probably was hacked again. Very few posts and problem attaching photos.
For the time being it may be best to stick to ig and we can find you there.
If and when photos can be attached, use a laptop or the full site if you use your phone. Vertical photos have always been a problem, so keep your photos horizontal. I find I have to remember to take a horizontal photo even if vertical frames the shot better. Not sure what happens with landscape. Great photos on ig. We
-
Hey everyone wanted to stop in and say hi!
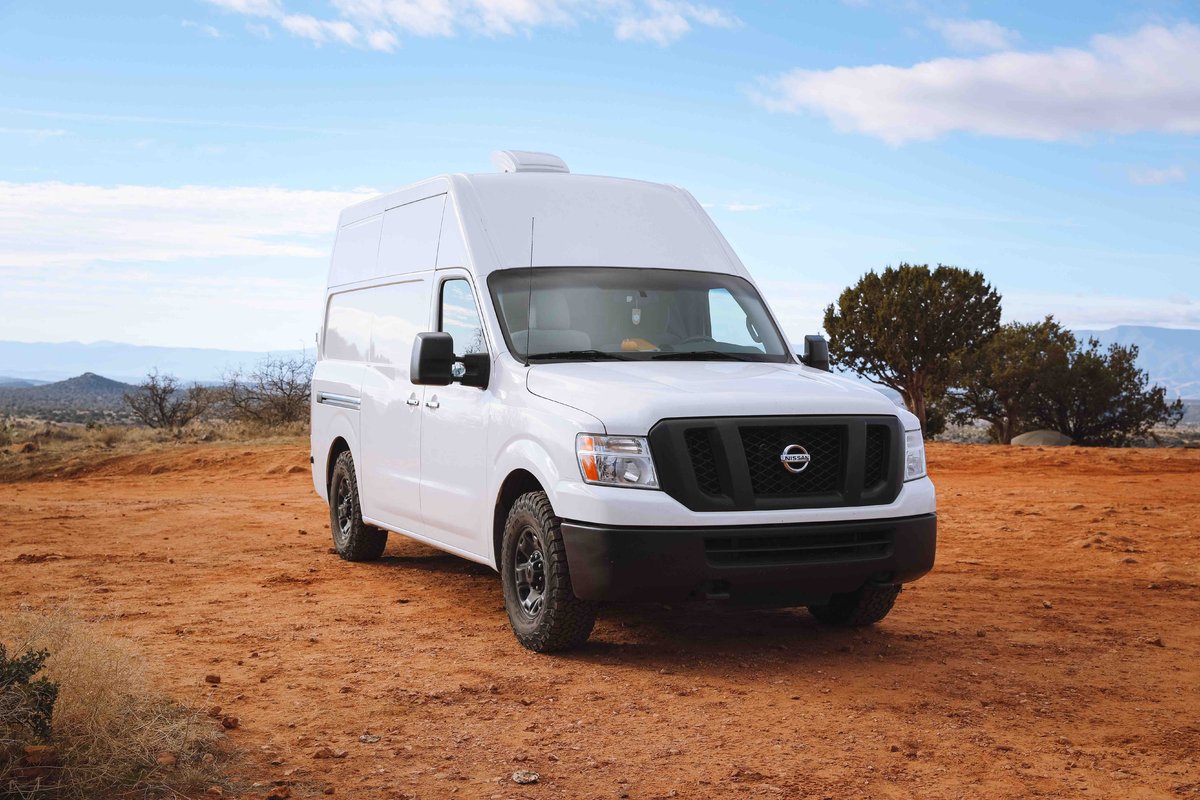
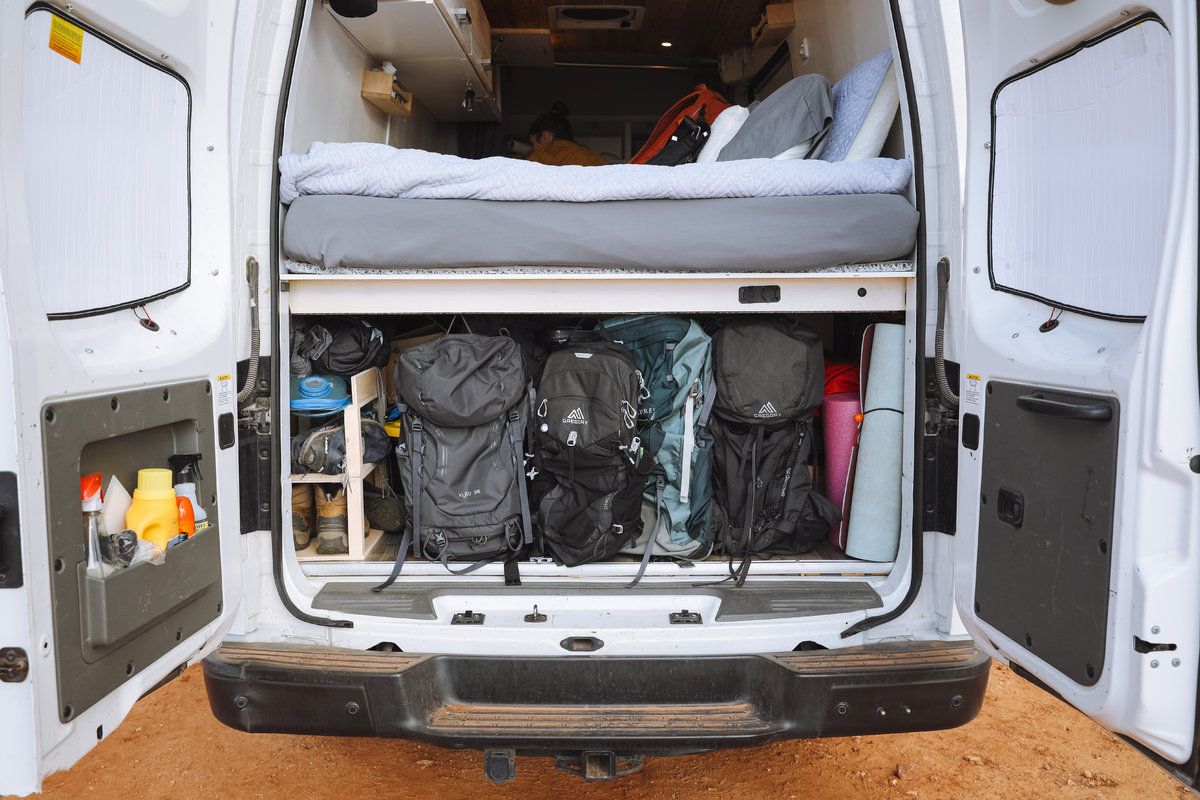
I'm Scott and originally from Phoenix AZ. I've been traveling full time in my 2012 Nissan NV2500 for about 3 months now with my girlfriend! My girlfriend and I built out this van for about 3 months on the weekends while we worked, which came out to about 32 days of solid hard work.
A little bit of a story for you. I used to work at the Nissan Proving Grounds (test center), so I can say I'm a fan of the brand :) . I was a Chassis Technician and worked directly with the Engineers to develop pre-production and post-production models. It was honestly a dream job! But ever since moving to Arizona, I've been addicted to traveling. Either it'd be backpacking into the Grand Canyon or flying to Peru to hike, I was hooked. So after many months of talking with my GF, we decided we wanted to do some sort of long term trip. Owning lots of Toyota's in my life, we almost decided on taking my 100 series Land Cruiser and building a bed frame then just sending off across the US! But we knew we wanted comfort and a place to work. Ultimately, we decided a van is the best idea. I refused to buy a Sprinter- I think we all know why lol. I also didn't want to drop all my savings on a Transit or Promaster. My first choice was an NV but they're actually hard to find for a good price, because they were always out of state and sold very quickly. So, the search went on for about 4 months. Finally, we found a 2012 NV2500 with 80k in San Jose. Booked our flights and flew the next day. It was a security system van and the owner of the business was selling all of his vehicles to downsize.
This is when the build started. Over the course of 3 months we planned and drew out our build. Knowing I couldn't keep my job and travel full time I had to face the truth, so I put in my 30 days in March and said goodbye to what I call my family. This was a big decision since job security is big to me. But I knew I wanted to travel while I was young, so I made sure to stick to my gut.
We gave my apartment complex a 30 day notice of leave, paid our fees and either donated or threw out what we didn't need in our life anymore. Let me say, having less crap in your life is a great feeling. April 1st hit and we said goodbye! We made our way through Arizona into Utah, then across Utah hitting all the National Parks. Cruised up the California coast into Oregon and now we're waiting for the mountains to thaw a little in Washington to start exploring!
My GF and I document our travels on Instagram like any millennial haha. Thats where most of our pics go, including a lot of pics and videos on the build! We both have highlights on our feed if you'd like to check out the build process. We don't have many good pictures of the layout and we really need to get on it.
But I'll try and include some here.
If you guys have any questions, feel free to ask! I sometimes suck at replying, but I'll do my best. Also IG message is good.
Instagram @scottyreichard
Instagram @dani_the_explorer
(none of my photos will upload despite being small file size and JPG. Any help?)
-
-
Seeing what people charge for high mileage sprinters, I think this is steal!
-
Does anyone know where I can find a used one? They're sold out until March 1st.
.jpg.c8eef1341c584f617a504243a6940e52.jpg)


ARB awning and tent addition
in Accessories & Modifications
Posted
What did you use for mounting the awning to the roof?