Decades
-
Content Count
87 -
Joined
-
Last visited
-
Days Won
12
Everything posted by Decades
-
Uploading files for those that want them. Sorry I didn't realize I could upload them sooner. I only have notifications on if folks message me directly. front outer rev.STL front inner rev.STL rear outer rev.STL rear inner rev.STL
-
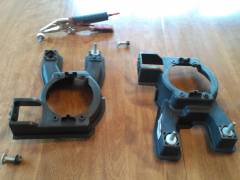
I have had some success 3d printing the plastic mounts that hold the sensors in the bumper from the outside. The sensor itself still needs to be intact, as well as the rubbery part between the flat sensor and the plastic part, but the metal springy arms that put pressure on the inside of the bumper can't be bent since the ones I printed were abs and brittle and would crack off at the four mounting tabs while trying to get the metal springy arms to hold it in place. PM me if you want the files (free), it costs about $7 each to have them printed from a printing service, or diy if you have a printer. They are different front and back, but mirrored (front inner= FI, works in both locations, rear outer= RO, front outer= FO, rear inner= RI) edited to add renders of the parts
-
 No increase in MPG, if anything a slight decrease, 11-12 MPG on my commute, around 13 on the highway. I try not to commute with it anymore, but it gets about the same when hauling stuff locally.
 -
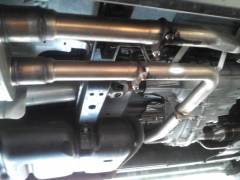
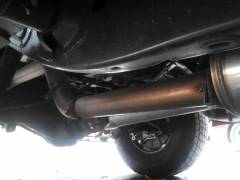
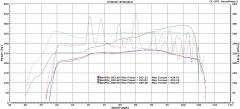
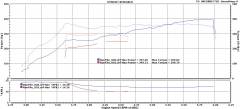
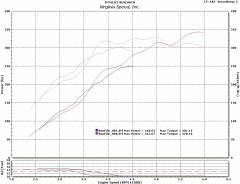
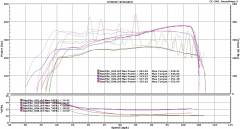
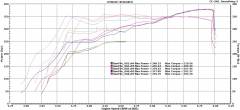
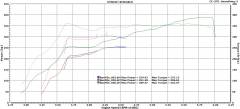
These were the higher set of numbers from Abacus Racing. Before 251hp/306ftlbs, after 389/362, at the wheel. There is another before/after from Virginia Speed that was 248/302 before, 342/328 after. Those were peak numbers, keep in mind the area under the curves when looking at before and after- with the before curves at Abacus, there was some jumpy data readings that threw off the peak numbers but overall they matched what Stillen claims on their graph on their website. I still have not put an intake on it, just a k&n filter. It does have headers, b-pipes, and exhaust.
-
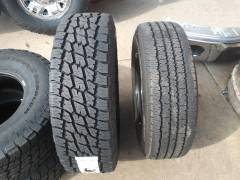 LT 285/75R17 Nitto Terra Grapplers
 -
I use a flat OBD extension to a Bluetooth bridge, and use the Torque Pro ($5) app on a Samsung Galaxy Player to automatically call out (and clear) CEL fault codes. It also logs them, in case it is not one that is expected. I get the post-catalytic trim too lean banks 1 and 2 from the supercharger that I haven't had deleted from the ECU yet. It clears them before I notice the light almost all of the time, and the app's voice gives the brief description as it comes in and is cleared. The bluetooth bridge is powered from the OBD port and an internal battery, and I keep the Samsung in the console plugged in and typically leave it on as long as I know the truck will be used again within a day or two.
-
Mine is a Quigley 4x4.
-
I use a Wilson "Little Will" magnet mount, with the cable routed down the front edge of the window that opens behind the driver on Passenger models, bringing the cable through the bottom so the window can still be shut and shed water. Not noticeable, but I stow the antenna assembly in the compartment to the passenger's side of the rear door opening. The magnet base and a few rags keep it from making noise. I never have a passenger directly behind the driver's seat since a car seat is in the space next to it, but once the cable is inside I route it behind the driver's seat and up along side.
-
I got mine through the Nissan parts department at the dealership, although the van came with some of them, too. You will need four of the smaller ones for each of the rear (last row) seats you remove, and a plug/cap for each (the plug/cap is larger for the smaller ones and are not interchangeable with the plug/cap for the longer covers- the part numbers I have for them are: 74812-1PB0A for "X61F SM SEAT RAIL CVR" and 74812-1PB1A for "X61F SM SEAT RAIL CAP" I don't have the part numbers for the longer ones.
-
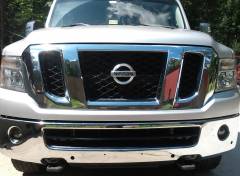
GenX website is being updated, but they are still open and can be contacted at: info@genxtrims.com These go on over the original grille. I removed the upper grille to install the GenX billet cover, the 4th piece was installed with the bumper in place.
-
From the album: Quigley 4x4 vs. Stock NVP SL
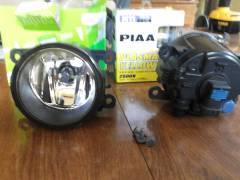
Original (passenger side) on Right and replacement fog light to replace the one on the driver's side that was lost. Trying out the PIAA ion yellow bulbs (H11 bulb type) claimed 110W brightness equivalent at 2500K but still use 55W. The fog lights are held to the fog light bracket using 3 T15 screws. I used self-tapping Phillips wood screws on the side I din't have hardware for. A post on the fog light bracket goes through the 4th mounting hole in the fog light. Both sides are identical parts, the parts diagrams I found online indicated that the only fog light available was for the Passenger's side. -
Before, during, and after from stock 3500 SL to Quigley + 2" lift, Nitto Terra Grappler LT285/75R17
-
-
From the album: Quigley 4x4 vs. Stock NVP SL
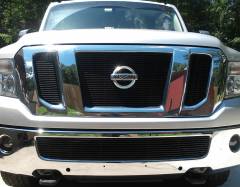
After bumper replaced, before GenX flat black grille cover installed. Parking sensors and licence plate not installed yet. -
From the album: Quigley 4x4 vs. Stock NVP SL
Removed upper grille assembly to install 3 peice kit, held on to original grille with zip ties. Lower Grille on chrome bumper was installed with the bumper in place, also covering the original part, fastened by zip ties. -
From the album: Quigley 4x4 vs. Stock NVP SL
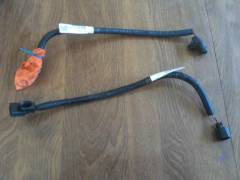
These wiring harness extensions are easier to remove once the bumper is off, but easier to install on the new bumper before it is replaced on the van. -
From the album: Quigley 4x4 vs. Stock NVP SL
2 self-tapping posts on the inside of each fog light bracket, not included with replacement part. I used locking pliers to screw the self-tapping posts into the appropriate locations on the replacement bracket, not touching the threads. -
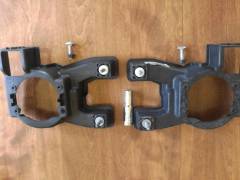
From the album: Quigley 4x4 vs. Stock NVP SL
Fog light brackets with hardware installed -
From the album: Quigley 4x4 vs. Stock NVP SL
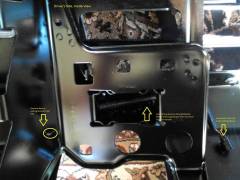
Before pulling bumper, route the harness for the Front Inner parking sensors from inside to outside, and remove the connector tab from the bumper bracket so the harness is keeping the bumper from being fully removed. -
From the album: Quigley 4x4 vs. Stock NVP SL
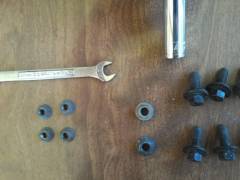
Bumper hardware and tools to remove- 12mm and 14mm -
Rick, Hate to pile on your troubles but all that fuel is going somewhere and if your Air/Fuel ratio is rich you can be fouling spark plugs and spoiling the catalytic converter so once the fuel problem is fixed you may have problems from those down the line. You may be able to get your A/F ratio measured with a tailpipe sniffer at a dyno if you have one local to you. I'm no expert, but I think a rich condition can be that an engine temperature sensor may be off (I think a cold engine runs rich to light off the cat, if that cycle is not ending your mpg will suffer). I use the Torque Pro App with a bluetooth OBD-II reader and it can log data like the status of the emissions, don't know if the tool you are using will tell you the status. If you are not getting to complete cycles it may be another (free) indicator that your ECU is still in warmup mode. There is a method to reset the 5.6L ECU that I found on a Titan forum that doesn't require any tools- http://www.clubtitan.org/forums/showthread.php?t=3481 (I used the "easy method") and it worked for me (to clear codes, I wasn't trying to reset the mapping)
-

Shattered Fog Light
Decades replied to sailorboy's topic in Glass, Headlights, Fog lamps, Lenses & Window Tint
Mine is a 2013 SL Passenger, and the fog light lens says "Valeo" at the top, molded into the glass lens- I ordered the following one from Amazon and it is identical (same part number on the back- 89210094): http://www.amazon.com/Valeo-W0133-1657785-VAL-Fog-Light/dp/B00FS9DOY2/ref=sr_1_3?s=automotive&ie=UTF8&qid=1433975305&sr=1-3&keywords=valeo+fog+light I removed the lower front of the inner fender plastic mudguard to get at it (you will probably need philips to remove fender mudguard) and a T15 torx bit to remove the fog lamp. The bulb in it is an H11- the one from amazon comes with one in it already, but it is removable from the housing with no tools (I was able to pull the bulb without removing the mud guard by reaching up under the bumper- twist <90 degrees counter-clockwise.) If anything is broken beyond what the picture shows from Amazon, there is a bracket that is available from Nissan that mounts to the bumper, it is a different part number for each side. Editing to add photo: -
Found the article- www.trucktrend.com/roadtests/pickup/1501_2016_nissan_titan_xd_first_look/ A little bit of conflicting information on this article, says the rear axle is from a Dodge Power Wagon and is a 10.5".
-
While my transmission was being worked on I asked Pat at Level 10 if it was feasible to replace the TCM from a Titan with high and low range so I might have been able to use a two speed transfer case. I was hoping that it was in the TCM programming to modify the output of the speed sensor signal on the output. He did not think that would work since the TCM communicated with the ECU and the ABS/ESC module- according to what Tatunka has said before, the problem is the disagreement between the speed sensor on the output of the transmission and the individual wheel speed sensors, right? I'm curious if while in 4WD/LOW only if the wheel speed can be emulated based on the output of the vehicle speed sensor so the computers never knew that the gearing had changed and didn't ever know the wheels were spinning. This would effectively eliminate the help the traction control provides on the rear with an open diff, but I read this week that the new Titan XD is going to have a 9.25 in the front and I believe an AAM rear with a Nissan-specific E-locker (I'll link the article if I can find it again, the press release on "The Auto Channel" gives the size of the rear as a 13") Is this the same size as the NV? The front diff on the Quigley is already locked electronically, right? Curious about the AAM one that was mentioned above if that was intended to replace the Quigley-supplied one.
-
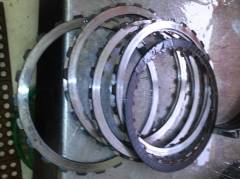
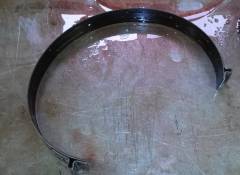
I'm not sure what caused the problem. Level 10 found burnt components, but also noted the plastic body of the TCM was melted (very unusual- pictures updated to my gallery of the burnt friction components and TCM) so instead of picking up the van on 12/25, a new valve body needed to be ordered and upgraded. I ended up picking up the van on 1/2/15 and drove it home. I spoke with Pat at Level 10 when I picked it up and he said that it was not so much that the transmission couldn't handle the power, it was that it wasn't calibrated for the way the power was delivered (I'm paraphrasing what he said, not a direct quote and apologize on my ignorance if this was not what he meant.) Level 10 worked with Stillen to modify my TCM and ECU programming. I supplied Level 10 with the before and after dyno graphs. I was very impressed with the customer service of Level 10 and Stillen this whole time. I spoke with JT from Stillen today as well- Stillen has the current programming of my transmission so if anyone is interested in getting the supercharger at this point I do not think that an upgraded transmission is a requirement. I would do it again though just for the peace of mind. I'm not convinced that it was not an isolated event that caused damage to the transmission- when I had the problem I identified earlier where I had a very hard shift due to an electrical connection, the transmission fluid was checked immediately and I was specifically told that it did not smell burnt (at 14700 on the odometer). I believe that if it was a problem with the transmission programming and/or my driving, the problem would have not suddenly appeared and there would have been signs of damage then. The 1 to 2 shift was only noticeable when the vehicle was warm, starting at about 17300 miles, the burnt smell when in manual mode was probably around 17500, and the flush occurred at 18243 miles. By then the damage was done, because I only made it to 18504 miles and there was friction material in the flush. Between 18243 and 18399 (my last fill up on the PA turnpike), the only symptom was a higher and higher RPM when the 1 to 2 shift occurred, and even then only when warm. Ever since approximately 18000 miles I drove it with my highest degree of mechanical sympathy. I have noticed a difference in the upgraded transmission, particularly on the 3 to 4 shift and when downshifting. The torque converter has also been modified, and I may notice a slight difference there as well. I've only put about 2000 miles on it since picking it up on 1/2, and have not noticed any change in fuel economy. I haven't towed anything with it yet. Temperatures are always in the lower 1/3 of the indicator band, ambient temperatures have been between the teens and 50's. Usually it is only 1 - 3 bars. Overall, I'm very happy with it, Level 10 did a great job and has great customer service, and I have the peace of mind of a warranty on the transmission now. Drain and fill intervals are 20,000 miles, I think it might hold an extra quart.
-

From the album: Quigley 4x4 vs. Stock NVP SL
Melted plastic on TCM (picture taken by Level 10 12/24/14)