Jump to content

Search the Community

Showing results for tags 'Storage and cabinets'.


More search options

  • Search By Tags

    Type tags separated by commas.
  • Search By Author

Content Type


Forums

  • Nissan NV Social
    • Welcome! Introduce Yourself!
    • Buying, Leasing & Ordering
    • Events & Gatherings
    • Lounge - Nissan NV
    • Lounge - Off Topic
  • Nissan NV Models
    • Nissan NV Model Specific
    • Nissan NV Model Year Specific
  • Nissan NV Modifications & Tech
    • Accessories & Modifications
    • Alarms, Keyless Entry, Locks & Remote Start
    • Appearance
    • Audio & Navigation
    • Brakes, Chassis & Suspension
    • Cargo, Hauling & Towing
    • Climate Control
    • Conversions
    • Engine & Driveline
    • Exterior
    • Glass, Headlights, Fog lamps, Lenses & Window Tint
    • Interior
    • Maintenance
    • Recalls & TSBs
    • Wheels & Tires
    • Upfits
    • 4x4 Conversions
  • Classifieds
    • Accessories and Parts For Sale
    • Nissan NVs For Sale
  • Nissan NV Community
    • Nissan NV Forum, Feedback and Help
  • Test Track
    • Test Section

Find results in...

Find results that contain...


Date Created

  • Start

    End


Last Updated

  • Start

    End


Filter by number of...

Joined

  • Start

    End


Group


AIM


MSN


Website URL


ICQ


Yahoo


Jabber


Skype

Found 2 results

  1. So It Begins! Conversion to home comforts and work space/tool storage. Upper cabinets running length both sides, narrow cabinets with work surfaces on deck, rear doors area all tool storage, removable bed the width of rear above banks of sliding drawers out the rear. Big area for soft goods storage above driver. Fitted console storage. The insulation from homerdep wasn't enough and the temperature was only 20C but should have been 22C. The last quarter of the bottles didn't cure the same as the first mixture. It might have been low humidity that day too. I've been using greatstuff to fill in the gaps. I'll glue reflective bubble insulation to walls, with a gap and thin ply overtop. Floor is going to have 2 inches of hard foam, plywood on top with vinyl. Those are the two oval covers for nut/bolt access for suspension height adjustment?? I can't seem to find any reference in the manuals, including repair manual. I'm leaning toward keeping the access open but if those allow a simple 3" lift then maybe I should do that first, then ply over. Has anyone knowledge about this? Could it be easily put back into shape with an hydraulic press? These bumpers seem to be a popular part to replace! I got a replacement and de-rusted it. Need to still repair that corner. Several more areas need rust work repairs. The price was right! This side step was a real mess of plastic and I couldn't take it so it will be fitted with iron wood. Insulation glued to well. Also, I don't like all the handle grips so I won't put them back, they get in the way and so far I'm still nimble enough to crawl in without them! Still figuring out how to release the spare tire. It is rusted in place. The rods to turn the gear are all bent and twisted. Penetrating lubricant is in I just have to get time to bang around the accessible parts. Where in your conversion did you put the tire change kit and jack? That left side rear, cabin air exhaust vent seems weird to keep as all the walls will be sealed. Thinking about covering it and having another vent out for cabin air - even if only cracking the maxvent open. Other specs: 200W solar, 2 x 125amp/Hr batteries, 2000W pure sine wave inverter, diesel heater, Maxx air vent, no toilet or sink planned but a cooler as fridge is liikely as it is more work oriented for now.
  2. From the album: 2013 NV2500 HD Camper Conversion

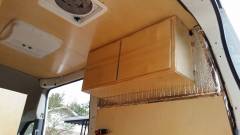
    I carefully cut the upper cabinet doors so the wood grain would continue from one door to the other. Using 5/8 inch Baltic birch 10 ply cabinet grade plywood. I found a supplier of 5x5 sheets of 5/8 for 20.00 a sheet. I used it for everything except drawer boxeswhich were 1/2 and cabinet back inside panels which were 1/4 inch. I will use 1/4 for the upper walls to reduce weight. All other walls with be covered in comercial cloth and insulation layers to finish.
×
×
  • Create New...