Search the Community
Showing results for tags 'conversion'.
Found 11 results
-
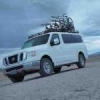
I have been a viewer of this site since I bought my used ’15 high roof NV2500 S V6 cargo van a few years ago. After much work and slow progress my wife and I have completed (mostly, are you really ever finished?) the conversion to a camper van. As you all know the NV is a rare sighting in the camper van world and so there is not a ton of DIY conversion info out there (as there is for the Sprinter, Promaster and Transit owners). Thought I would share what we have done for anyone who is interested. We did all the work ourselves and minimized the use of aftermarket add-ons (i.e. expensive) where possible or practical. I like the NV for the rugged dependability and ease of working on but wish it was about 1 foot longer and had a larger following for support. We had a difficult time trying to fit everything in that we would have liked so we had to make compromises. We mostly camp off the beaten path and come from a background of tent camping so an indoor shower and toilet were out. I toyed with the idea of the 4WD aftermarket conversion but have found that I can go just about anywhere I need to go with the upgraded tires, tire chains and judicious driving. Below is an overview list of what we did. Adding some pictures also. If anyone has questions on what we have done I will do my best to answer, i.e. electrical design, method or materials of construction, design choices, etc. Happy trails! Electrical 500W of solar panels, 300 Ah AGM batteries (2x 6V), 2000W inverter/charger, 220W DC/DC charger for charging house batteries from alternator (with Bluetooth comm), battery monitoring system (with Bluetooth comm). The electrical system is more than adequately designed to allow us to cook (portable induction cook top), run our heater and also recharge our e-bikes daily. LED lighting, 12VDC plugins, 120VAC plugins, USB charging stations, etc. Cabinetry Wooden framed (pocket screwed), sheathed with plywood, bolted into van. Had considered using the popular 80/20 AL framing but the wooden framing is very strong/lighter weight/less expensive and has proven itself through miles of rough roads. Heating Forced air propane heater (Suburban NT-16SEQ, much less expensive, runs quieter, easy to install and needs less maintenance than the very popular Webasto or Propex), 10 lb. propane tank (enough propane to last us about a week in cold weather), thermostat control added to the heater. The 10 lb. tank is contained in a specially made enclosure that vents to the outside. The tank has a Bluetooth enabled level sensor that allows fairly accurate determination of remaining propane. Cooking We usually cook on a portable induction cook top but also have a single burner propane stove that runs on the small green propane bottles. Have a couple of bottles usually on hand which can be used to provide propane to the heater through an adapter if we run out from the 10 lb. tank. Water (3) 16 gallon plastic storage tanks with foot pump to dispense water to a built-in kitchen sink/faucet. The sink drains out below the van but we have the option to easily connect a 5 gal. grey water container to the drain under the van if needed. Refrigerator Built-in top load refrigerator/freezer (IndelB TB51A) Sleeping A memory foam bed custom cut for 2 which is stored overhead against the ceiling when not in use via a hand crank system. Sleeping arrangement is head and feet towards the sides of the van. Added sidewall flares to accommodate 6 ft plus for this sleeping arrangement. Seating Removable rear seating w/ seatbelts for 2 (utilized a bench seat from a VW Eurovan)(not shown in pictures). Standard NV factory seats up front. Bench seating for sitting at the dining table when the bed is raised to the ceiling. Miscellaneous Add-ons MaxAir vent fan Roof rack made from aluminum square tubing (for mounting solar panels) Overhead backup lights Side slider window in the sliding door Flares on the rear side panels to increase interior width and allow transverse sleeping arrangement Larger tires (BF Goodrich T/A KO2 265/70 R17) Much better tire than the stock Firestones. Traction boards, shovel and come-along stored onboard for those instances of getting stuck 2” receiver hitch with wiring (my NV S model did not come with a hitch) Swing away receiver hitch platform bike rack for 2 ebikes (constructed using parts I already had) Ladder stored onboard Side awning (using tarp, hooks mounted on roof rack w/ L-track, collapsible poles) Portable shower & small bucket toilet (toilet only for use when other options not available) Portable air compressor Aftermarket stereo with NAV, backup camera and upgraded speakers Mosquito screening (removable) at slider door and front door windows Very well insulated throughout with insulated coverings for all windows Hidden anti-theft switch wired into the engine starter circuit Propane and CO2 alarms Fire extinguisher Overhead storage shelf above driver/passenger seats (this increased our storage space by a lot)
-
So It Begins! Conversion to home comforts and work space/tool storage. Upper cabinets running length both sides, narrow cabinets with work surfaces on deck, rear doors area all tool storage, removable bed the width of rear above banks of sliding drawers out the rear. Big area for soft goods storage above driver. Fitted console storage. The insulation from homerdep wasn't enough and the temperature was only 20C but should have been 22C. The last quarter of the bottles didn't cure the same as the first mixture. It might have been low humidity that day too. I've been using greatstuff to fill in the gaps. I'll glue reflective bubble insulation to walls, with a gap and thin ply overtop. Floor is going to have 2 inches of hard foam, plywood on top with vinyl. Those are the two oval covers for nut/bolt access for suspension height adjustment?? I can't seem to find any reference in the manuals, including repair manual. I'm leaning toward keeping the access open but if those allow a simple 3" lift then maybe I should do that first, then ply over. Has anyone knowledge about this? Could it be easily put back into shape with an hydraulic press? These bumpers seem to be a popular part to replace! I got a replacement and de-rusted it. Need to still repair that corner. Several more areas need rust work repairs. The price was right! This side step was a real mess of plastic and I couldn't take it so it will be fitted with iron wood. Insulation glued to well. Also, I don't like all the handle grips so I won't put them back, they get in the way and so far I'm still nimble enough to crawl in without them! Still figuring out how to release the spare tire. It is rusted in place. The rods to turn the gear are all bent and twisted. Penetrating lubricant is in I just have to get time to bang around the accessible parts. Where in your conversion did you put the tire change kit and jack? That left side rear, cabin air exhaust vent seems weird to keep as all the walls will be sealed. Thinking about covering it and having another vent out for cabin air - even if only cracking the maxvent open. Other specs: 200W solar, 2 x 125amp/Hr batteries, 2000W pure sine wave inverter, diesel heater, Maxx air vent, no toilet or sink planned but a cooler as fridge is liikely as it is more work oriented for now.
- 18 replies
-
- 2
-

-
- storage and cabinets
- insulation
- (and 2 more)
-
From the album: 2013 NV2500 HD Camper Conversion
Nearing completion of my conversion. -
I'm looking to attach a few panels to the walls and crossbeams on my 2013 Nissan NV2500 High Roof using Rivnuts and Plusnuts (Cross Nuts) but I can't seem to find the wall thickness information. I have the service manual and the bodybuilder's guide but I can't seem to find the information in there and I need it in order to get the right grip range (thickness) for the nuts. Thanks
-
Hello all! I'm not SUPER new to the forum, but I haven't posted much. One guy on here really went the extra mile to help me with stereo installation. Anyway... Im working on making my 2013 NV2500 S (high roof) a camper. The entire thing is now insulated with a combo of styrofoam and spray foam EXCEPT for the rear doors and the "archway" around the rear doors. I was wondering if anyone else out there has insulated these parts of their van and if they have tips. Obviously there are things I need to work around (mechanical parts inside the doors) and I'll probably have to remove taillights so I don't fill 'em with sprayfoam, etc. I guess what I really want to know is... is it worth it to insulate these parts and if so, do you have tips?
-
Quick question, now that we have the Vin number we are in the process of looking for insurance for our NV2500. Any recommendations for insurance companies? Most car insurance websites don't even list the NV. It would also be nice to be able to insure the customized interior. Thanks for any suggestions!
-
I'm looking to replace my '06 Sprinter passenger van with something that has 4x4. (I had to put tire chains on nine times to go skiing this winter!) This is my daily driver/family van (six kids), and the second Sprinter I've owned. I love it but I'm getting sick of making repairs on it (only 110k miles). It's a pain to find someone who will work on it and has a clue what they're doing. I'm seriously leaning toward a Nissan NV with a lift and 4x4 conversion because it comes with a 5-year warranty vs. Mercedes 3-year offering, and it would be much easier/cheaper to find service when needed. Nissan NV: quieter, rides better, side-curtain air bags, tows almost twice as much as a Sprinter, lower roof without external a/c - better for garage and ski racks. Mercedes Sprinter: factory 4x4, better seating and more cargo space, full electronic safety package (blind spot, collision avoidance, etc). And I love the rubber floor of the Sprinter. Any real-world feedback or other options I should consider? And why doesn't anyone make a van with seats that recline?!!!
- 13 replies
-
- 1
-
-
- reliability
- sprinter
- (and 2 more)
-
 I get "hit" most often when I go grocery shopping. Last week, as I was loading bags thru' my side door, 2 older men came up and got into deep conversation about DIY campervan conversion. I probably talked to them for 15 minutes. Near end of convo, there's a late 20s gal waiting to talk to me. SHE wants to do a DIY, has an online job and a 3yo child.. so ready to hit the road! I talked to her another 10 minutes. I really think I need a flyer or brochure or something! LOL.
 -
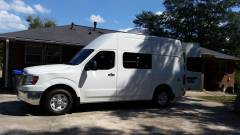
Just finishing a van conversion on a 2012 NV3500 HD SV into an efficiency apartment on wheels. Great vehicle for this application. Also tow a 30' trailer with the factory installed towing option.
-
 Hi everyone, been lurking for a while but wanted to say hello now that we (my wife and I) factory ordered a NV2500. We were surprised we were able to get $4800 off MSRP and got it for just over $32k out the door. Should receive it in late August and then we'll be converting it to a camper van. Using this NV2500 as a template for conversion. Won't do a flip sofa/bed but instead a bed with a 20 inch pull out at the foot end. 200W Solar, stovetop/oven, 12V marine fridge, 225aH battery and a few other goodies. We are in the process of setting up a conversion and road trip blog as we'll be on the road the next 2-3 years at least. Leaving the career world in Washington DC behind taking a early/mid career retirement and returning to nature. We'll be based out of a small condo in Tahoe/Squaw Valley but will be on the road 90% of the year at least. I'll update once we picked up the NV. Mahu
 -
Hey - Bought my NV a few weeks ago and finally was able to do something today. I very nervously cut a 2 3/4" hole through the side of the van. I then plugged it with a 30A inlet to power the eventual inverter and charge the eventual batteries. Ultimately, I will be turning my NV into a mobile showroom and very basic cabinet shop. I have two questions: although I've learned a tremendous amount from this site, among others, I'm still unsure of what brand of inverter to purchase. I'm fairly certain I will be buying a 2K watt pure sine inverter and am considering Tripp-lite and Xantrex. Anyone out there feel strongly for or against, or have a recommendation? Also, probably going with sealed AGM batteries, but am open to any input. Last- I know it's three things now- I'm considering documenting this conversion from beginning to end; are you folks interested? If so, is there a preference for video over photos or is that unimportant? Thanks and I'm looking forward to hearing from you. Chris