-
Content Count
215 -
Joined
-
Last visited
-
Days Won
23
Everything posted by mahu
-
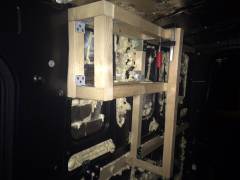
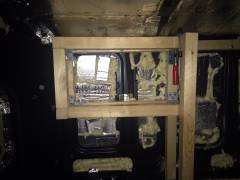
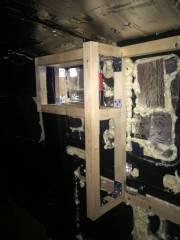
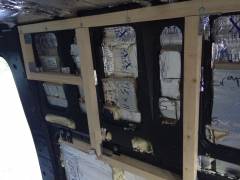
Chris asked how i attached the framing. "The middle beam uses the reinforced mounting points using m8x1.25 bolts. This is what will carry the majority of the weight of the cabinets. I put a 1.5x3 inch stud below those points into the recessed area and then used mending plates to connect it to the mounting points. On top of the 1.5x3 sits a 1.5x1.5 picket which provides the bottom support for the cabinets. The bottom beam is attached through existing holes in the inside part of the sheet metal using bolts, washers, lock washers and bolts. It'll be used to hold in place the bed platform and won't carry too much weight as it'll have support beams down onto the floor once the flooring is installed. Also there are 8 or so bolts so whatever weights rests on it will be distributed. There is also a m6x1 mounting point towards the sliding door i am using. The top beam uses the upper row of existing holes in the sheet metal. On the drivers side that meant rerouting the cable strand to make those holes accessible. It will go through the cabinets when it's done. Not sure if there was an easy way to remove those plastic clamps holding in place the cable strand but those were a pain in the behind to pry out. Securing the bolts in the top row was a pain as there is little room to work with but i got washers lock washers and nuts on them from behind so it should stay nice and tight. Happy to share more detailed pics if interested."
-
The middle beam uses the reinforced mounting points using m8x1.25 bolts. This is what will carry the majority of the weight of the cabinets. I put a 1.5x3 inch stud below those points into the recessed area and then used mending plates to connect it to the mounting points. On top of the 1.5x3 sits a 1.5x1.5 picket which provides the bottom support for the cabinets. The bottom beam is attached through existing holes in the inside part of the sheet metal using bolts, washers, lock washers and bolts. It'll be used to hold in place the bed platform and won't carry too much weight as it'll have support footings down onto the floor once the flooring is installed. Also there are 8 or so bolts so whatever weights rests on it will be distributed. There is also a m6x1 mounting point towards the sliding door i am using. The top beam uses the upper row of existing holes in the sheet metal. On the drivers side that meant rerouting the cable strand to make those holes accessible. It will go through the cabinets when it's done. Not sure if there was an easy way to remove those plastic clamps holding in place the cable strand but those were a pain in the behind to pry out. Securing the bolts in the top row was a pain as there is little room to work with but i got washers lock washers and nuts on them from behind so it should stay nice and tight. Happy to share more detailed pics if interested.
-
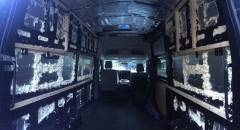
Started working on the frames for cabinets.
-
From the album: Travels With Charley
-
From the album: Travels With Charley
-
From the album: Travels With Charley
-
I started a separate album and will put photos in there. http://nissannvforum.com/gallery/album/67-travels-with-charley/
-
From the album: Travels With Charley
-
Insulation is done, consisting of Rattletrap Xtreme and 2-4 inches of polyiso foam boards. Gaps filled with big gap spray foam. Electrical is next. Wanted to post photos but I can never figure out how to. Sometimes there is an "attach file" button somewhere but often it's not there and when I try to include a link to an external site like imgur the link gets blocked. Not very user friendly. If I can figure out how to post photos I'll put some up.
-
I think there is a mistake in the manual. It says wall points are M8 x 1.25 while roof points are M6 x 1.0. The M8 x 1.25 I got fit perfectly into the roof so M6 would be too small. Question: Is there a need to use some kind of thread locking to prevent the bolts from loosening over time?
-
Just took the NV for a drive around the block to celebrate the fan install and my wife and I both noticed a high-pitched wheezing sound coming from the engine when accelerating. Could only test it at 10-20mph in our residential neighborhood and also can't hear it at higher speeds due to road noise surpassing it. It occurs as soon as I touch the accelerator however gently and is the same in drive as it is in park. It gets louder the harder I step on the accelerator and it goes away as soon as I let up. And it's very distinct and have never heard it before. Had regular oil changes at 3500 and 7000 and are at 7800 miles now. Thoughts? Thanks!
-
Conversion has begun. Rattletrap is in, foam board are going in and that *@$^$# fan is installed too. :-) So whoever said cutting that hole was "fun" and that it would "take 30min" is a darn liar or is way more adept with a jigsaw than me. :-) Damn metal shavings, glad I wore good googles and a face shield and long sleeve pants and shirt. Picked between the 1st and 2nd rib as a good place and boy was it a tight fit to get the Fantastic Vent in there. With prep work, the pilot holes in the 4 corners, cutting everything with jig saw, deburring, Por15, weather sealant and 3M VHB and Dicor self leveling sealant it took about 6 hours over two evenings. Glad the major hole cutting of the conversion is done. Now just a few small round ones for the solar panel cables and the Propex Heater inlet/outlet. Onwards to finishing the insulation on the walls, then ceiling and floor. Wife is taking care of all the electrical planning and once that is in onwards to wall and ceiling paneling, then bed platform and kitchen. Isotherm CR130, Atwood 21 inch stainless steel oven, and Propex have arrived. Waiting for solar panels but all the wiring and controllers are here. Should be all done by the end of August. I'll post an update in a few.
-
Ran into a lovely couple (Janel and Jeff) in Tahoe yesterday spotting their converted NV2500 high roof on a roadside campground. Of course we pulled over and chatted about NV and conversion. Lots of great suggestions. One thing Jeff was saying that he had heard about spot welds popping and creating rattling when putting the fan between the rib and that's why he put it infront of the first rib cutting the seam instead. Any of you who placed it between ribs have had any issues along what he mentioned?
-
So my brother in law who restores old Mustangs reacted all shocked when I told him about the van conversion and he found out that I hadn't put an undercoat underneath the NV. I didn't even know that was a thing... He is trying to convince me that I need to undercoat the van asap to prevent rust especially since they salt the roads here in Tahoe. Any thoughts? Is it really necessary? Being from Germany where roads are salted and wet for many many months and the climate is quite wet I haven't heard of anyone with a new(er) car having rust issues. I thought that was a thing of the past. So, is he just being paranoid based on his work with old rusted-through Mustangs or should I consider an undercoat? Thanks!
-
Thanks for the suggestions! I'll probably go with either the second or third between the ribs area next week.
-
Thanks everyone for the replies! Glad to hear it's and easy mod!
-
Apparently there is Extruded polystyrene shortage in NorCal and the clostest Home Depot carrying it is 200+ miles in the Bay Area. I was pretty set on either using Dow Styrofoam (blue) or Owens Corning Foamular (the pink panther kind), both XPS, in combination with dynamat and relfectix but the unavailability of it has made me reconsider Polyiso which is readily available. It's hard to know what the true pros and cons are as both product lobbys have publised their own studies regarding R Value retention and moisture resistence. XPS: -R Value more stable in lower temp -more resistent to moisture -more outgassing and way more greenhouse gasses -toxic fire retardent outgassing - lower melting point which may be reached behind dark sheet metal Polyiso: - higher base R value but drops by 25-30% around 30F - R value may degrade long term but probably less of an issue inside an RV where it's not expose to the elements as it would be outside a house -may absorb more moisture but issue reduced with foil facing. also the tests of submerging it in water seem extreme compared to the moisture it is exposed to in a camper so the technical difference of absorption may not be relevant in a camper -more fire retardent -less outgassing and no toxic fire retardent gasses -almost no greenhouse gasses during production -higher melting point of 260F -easier to attach and seal gaps between panels I think in the end both are probably fine options and not wanting to drive 8h round trip to get 4 2x8 panels of XPS I may go with Polyiso. Polyiso seems to be used more frequently in foam board insulation conversions, not sure if that is because it's better or because no one can get a hold of XPS. Thoughts or experiences anyone?
- 1 reply
-
- insulation
- xps
-
(and 1 more)
Tagged with:
-
This might have already been answered in the forum but I can't find it. How hard is it in terms of wiring to remove the three cargo area lights? They don't do much in terms of illumination and will just get in the way of my insulation and break up my wood ceiling. I assume the three lights branch off the main cable strand going to the alternator in the back, roght? Is it a simple job of taking off the light fixtures, cutting the wires where they come out of the main cable and insulate their ends? Or would that causes problems? Sorry if these are dumb questions, new to the electrical stuff, glad when I can move on to woodwork :-)
-
Reading nihil-perditi's post about cutting a big hole in the roof for a sun roof and questions about structural integrity reminded me of an ongoing question I have about where best to place the fan. Looks like all fans require a 14x14 opening but there is a max of 13.5 inches between the ribs of the roof. There are a longer section in front of the first rib and behind the last rib in the back but both areas have seals that'd have to be cut. So, where did all of you put the Fantastics and Maxx fans without cutting into ribs or seams? Do they really require a 14x14 opening or can the fan opening be squeezed between ribs being 13.5 inches apart?
-
Just passed 7,000 miles and getting got 18.9 MPG measured at the pump. About 3,500 miles were fully loaded driving cross country with 1,500 lbs of stuff in the back. The other half were mostly empty but driving up and down Donner Summit and around Truckee/Tahoe at 6,000 feet, sticking to mostly 50-60 MPH. Not sure if I have a light touch or if we just got lucky with the engine but I am very happy with 18.9 MPG. Filled up the little dashboard computer shows a range of 486 miles, which I think is slightly optimistic, should be closer to 440 miles. We also have an Automatic plugged into the OBDII port which is a fun way to see where we have been, fuel consumption, and reminds you to avoid sharp acceleration and breaking. Now if the snow in Tahoe could melt I could finally get off the slopes and start the conversion...;-)
-
yep, i spotted it from a mile away. there are a bunch of white Sprinters here but the NV can't hide anywhere. :-)
-
So, who is visiting us from Montana? Saw this white NV in the parking lot here in Squaw when I drove home. Pulled over and took a peek. Definitely a camper, saw some shelfs and furniture inside. any idea whose NV this is?
-
Hehe...I'll let you know when I do. Can't do much structural work right now with the way it's been snowing in Squaw Valley. I am doing prep work and ordering all the supplies and appliances right now and will start conversion when Spring comes around, probably in early/mid March. I am hoping since it's a circular cut and using a hole saw with a pilot drill I can't screw it up too badly. I'll probably get some sheet metal scrap pieces to make some practice some cuts.
-
You are welcome! Decided to get two of them. One in the front over the kitchen for venting out and one in the back to bring fresh air in. Should provide nice air circulation. In terms of cutting out the round hole I found the perfect-sized hole saw here: http://www.automationdirect.com/adc/Shopping/Catalog/Tools_-a-_Test_Equipment/Hole_Cutting_Tools/Multi-Purpose_Hole_Saws_(HSS_-a-_Co_8)_-a-_Accessories/Cobalt_(Co_8)/126160


